Welcome to the fourth lecture,
Last Updated: 2024-1-11
Why should I care about DevX?
- Understand how rapid prototyping works
- Find a way of working together
- Use some standard documents to facilitate explicit and assertive communication
- setup GitHub
- Appreciate how to create focus and intentionality when having to chose dev-tools, choosing between N different ways of achieving the same thing
- appreciate how containerization enables rapid prototyping
What you'll build today
By the end of today's lecture, you should have
- ✅ a productive local setup
- ✅ a best practice image for one of your Dockerfiles
- ✅ a DockerCompose with two Images
- ✅ a simple build pipeline on github, that allows different architectures (in case your team has Mac and Intel arch)
Homework (Flipped Classroom)
Prepare
- Your github repo on your teams github Org
- All of your team have GPG keys and can commit verified commits
- Your team has identified a primary component to use to containerize today
PreRead
- https://learning.oreilly.com/library/view/docker-up/9781098131814/ch06.html#:-:text=Let's get a,running something like%3A
- https://www.youtube.com/watch?v=82ZCJw9poxM
What you'll need
- Install a form of
docker clilocally ( you can use any product suite that works for you such as docker-desktop, rancher-desktop, orbstack etc etc) - Install
makeon your local machine - Your teams' github organization where all your team has the proper access rights and everyone can have their own branch
- The usual (git, slack, MFA app, laptop with internet, github account etc)
In the beginning, there was The Agile Manifesto
Many iterative approaches today originate somewhere around this manifesto https://agilemanifesto.org
Rapid Prototyping
Evolutionary Architecture is the art of constraining the blast radius of an incorrect decision (find the correct M Fowler citation), we will now explore methods of communication and process around iterative approaches:
- the problem space exploration should be value focussed
- solution space constraints should first be derived from 'human to human' aka productivity concerns, followed by feasibility , followed by simplicity
- only once the problem is well understood and it's clear that the humans that will work on it as well as the humans that will use it, can understand it -> then we find the best possible technical solution
The importance of a local setup
When playing with an idea, we need to start with the least amount of cognitive friction as possible. So, the ability to set up a local development environment where we are independent of various failure modes (like e.g. the internet) is crucial.
We want to avoid context switching and rabbit holes, as much as possible.
Later in the lectures, we ll work on kubernetes, which is distributed, prescribes policies, is remote and hard to debug -> immediately writing a deployment for k8s, would be not just a colossal time-sink, but also distract us from understanding the core idea that we are iterating over. it would steal our focus.
Fail fast
Our goal must be to have a setup in which we can elastically fail and react quickly to the insights gained from each failed attempt, such that we can keep cognitive coherence.
We must proceed systematically and pose hypotheses that we can note down after each attempt. We can use the time when we write into an ADR as a reflection or meditation session between attempts.
It is tempting to go too fast, and forget to note down in a lightweight way our insights. This usually leads to regrets later.
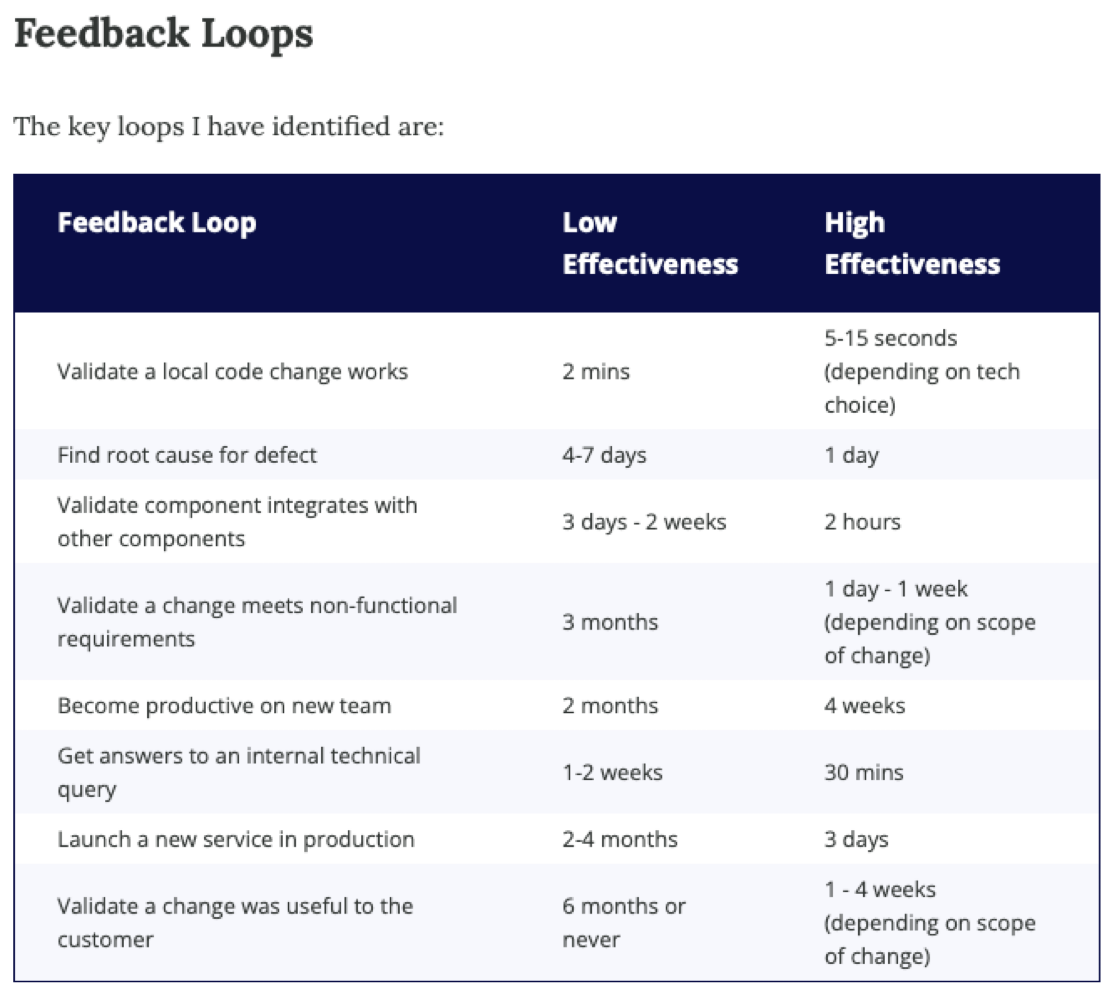
https://martinfowler.com/articles/developer-effectiveness.html
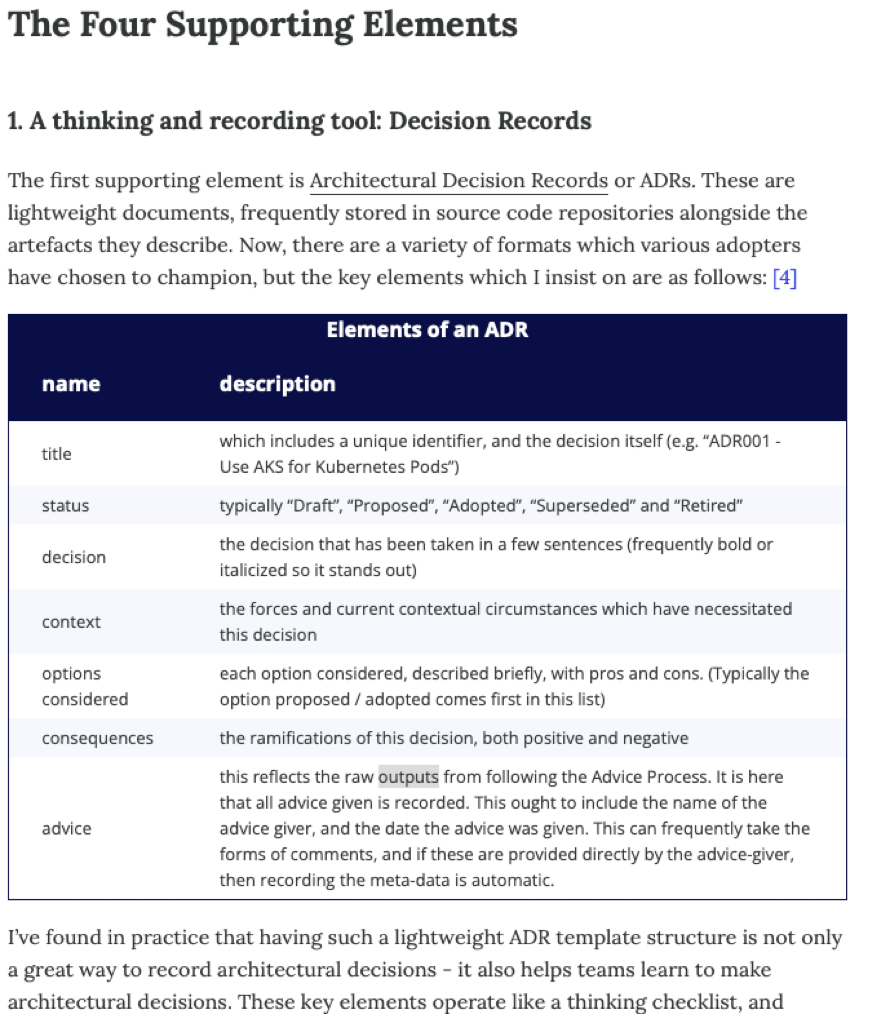
Architecture Decision Record
Architecture Decision Records (ADRs) are documents that capture important architectural decisions along with their context and consequences. They are beneficial for team reasoning for several reasons:
- Transparency: ADRs provide a clear record of why decisions were made, making the decision-making process more transparent for the entire team.
- Knowledge Sharing: ADRs help disseminate knowledge across the team, especially for those who weren't part of the original decision-making process. This can be particularly useful for new team members.
- Context Preservation: Over time, the context and reasoning behind a decision can be forgotten. ADRs preserve this context, making it easier to understand why a decision was made long after the fact.
- Decision Revisiting: ADRs provide a basis for revisiting decisions. If circumstances change, teams can look back at the ADR to understand the original context and assumptions, and then reassess the decision.
- Conflict Resolution: By forcing a formal decision process, ADRs can help resolve conflicts within a team. Everyone has a chance to voice their opinion, and the final decision is documented for everyone to see.
- Consistency: ADRs help ensure consistency across decisions, as they provide a standard way of recording decisions.
In summary, ADRs are a valuable tool for improving communication, preserving knowledge, and ensuring transparency and consistency in decision-making within a team
https://martinfowler.com/articles/scaling-architecture-conversationally.html
Lets see what projects are out there and how they differ
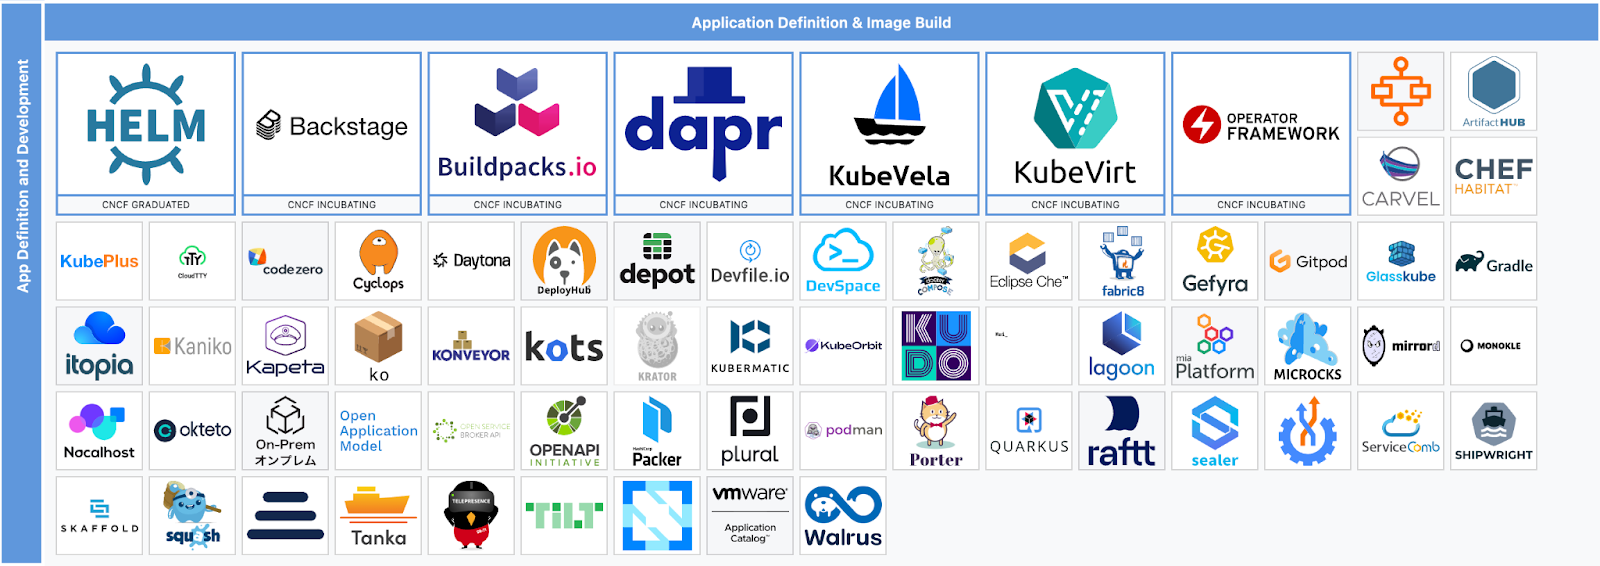
Navigating Container Landscapes
This is the only lecture where we won't have a CNCF tile for. But worry not, there's tons of products out there to tempt you to buy their solutions.
Some of the tools listed in App-Delivery are relevant for DevX, but it's a bit all over the place
But: we need to make sure that git can really tell it's actually YOU
So, first off: let's set up some best practices, which is signing your commits:
https://docs.github.com/en/authentication/managing-commit-signature-verification/signing-commits
- Generate your signing key if you don't have one
https://docs.github.com/en/authentication/managing-commit-signature-verification/generating-a-new-gpg-key
Now test , that your commit show up as ‘verified' on github
export GPG_TTY=$(tty)
git add something
git commit -m "test if this commit is verified"
git push

Rationale:
Signing your Git commits involves attaching a digital signature to each commit you make. This signature is created using a private key that only you should have access to.
The main benefits of signing your commits are:
- Authentication: The signature proves that the commit was made by you. This prevents someone else from making a commit and claiming it was made by you.
- Integrity: The signature proves that the commit hasn't been tampered with since it was made. If someone modifies the commit after it's been made, the signature will no longer match and Git will warn you of the discrepancy.
These benefits help protect you from identity attacks. For example, if someone gains access to your Git account, they can't make signed commits without also having access to your private key. This means that even if they make unauthorized commits, those commits won't be signed and can be easily identified as not being made by you.
To verify the signature of a commit, others need your public key. If the commit's signature matches your public key, they can be confident that the commit was made by you and hasn't been tampered with.
Remember, the effectiveness of commit signing as a security measure ultimately depends on how secure your private key is. If your private key is compromised, an attacker could make commits that appear to be signed by you.
If you don't sign your Git commits, someone else can pretend to be you by simply configuring Git with your name and email address. Here's how they can do it:
They configure Git with your name and email address:
gitconfig--globaluser.name"Your Name"gitconfig--globaluser.email"your.email@example.com"
They make a commit:
gitcommit-m"This commit looks like it was made by you"
Now, when someone views this commit, it will appear to have been made by you, because the commit's author information matches your name and email address. However, if you sign your commits, this kind of impersonation can be easily detected. Even though the impersonator can set the author information to your name and email address, they can't create a valid signature for the commit without your private key. So, if someone checks the signature of the commit, they'll see that it's either missing or doesn't match your public key, indicating that the commit wasn't actually made by you.
Do not believe the internet, when it comes to so-called best practises, please stick to official recommendations, especially those from known security experts
You could start on killercoda https://killercoda.com/docker , we'll likely not have time during class for this one. You can do it in your own time.
Why Docker- (Compose) made developers happy
Docker containers can replace local installations by encapsulating the software and its dependencies into a standardized unit for software development. Here's how it works:
- Isolation: Each Docker container runs in its own isolated environment. This means that it has its own filesystem, networking, and isolated process space. It's like running a virtual machine, but more lightweight.
- Reproducibility: Docker containers are built from Docker images, which are essentially snapshots of a container's filesystem. You can define a Docker image using a Dockerfile, which is a text file that specifies what should go on the filesystem of the image. This makes it easy to share your software and its dependencies, ensuring that it works the same way everywhere.
- Portability: Docker containers can run on any machine that has Docker installed, regardless of the underlying operating system. This makes it easy to move your software from one environment to another, for example, from a developer's laptop to a test environment or from a staging environment to production.
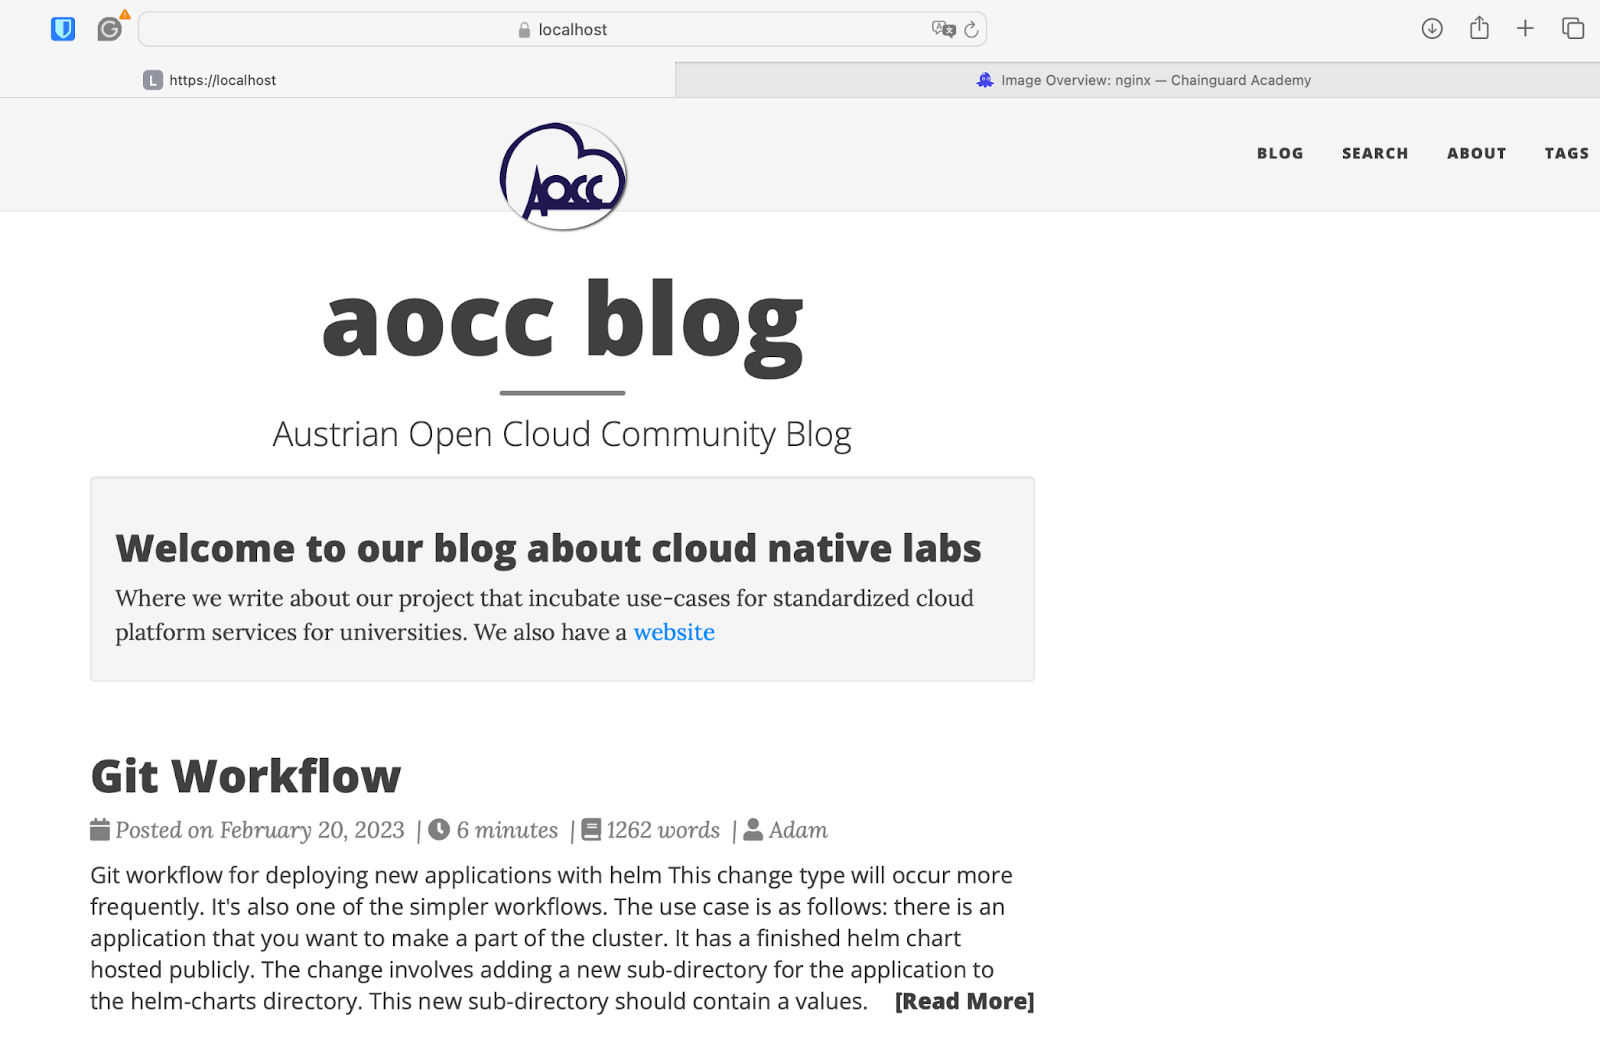
In our Docker Compose file, the aocc-blog service is built from a Dockerfile and replaces a local installation of the software. It's configured to use specific volumes and ports, and it has a health check and restart policy. This setup ensures that the service runs in a consistent and predictable way, regardless of where the Docker container is running.
This means, that you don't need to install anything on your laptop other than Docker?
Well, yes, that can be true.
Some developers however do so much coding in their primary language that a full traditional installation makes sense.
However, it is definitely recommended for uncommitted people, who are just trying out a certain version of a language or are doing a small thing in a non-primary language.
It comes down to personal preference.
(Your instructor has GO installed, but nothing else. She is very happy to not have a gazillion of python installs anymore)
The image building itself
During the following exercise, we'll build a static webpage using the hugo framework, for which we need nodeJS. Please take notes on some of the images characteristics, at minimal , write down the size of each image
git clone git@github.com:AustrianDataLAB/multi-stage-build.git
cd multi-stage-build
git checkout features/tarball
make generate_certs
make image1 up
Let's look at the Dockerfile, it is very straightforward and also very problematic.
FROM node

COPY . .
RUN npm install -g grunt-cli \
&& npm install \
&& grunt lunr-index
RUN apt update -y && apt install -y hugo
Fix 0: Use Non-Root
Do not run the image as root, but create a proper user and fix the permissions.
We will be switching to Chainguard in the last step (Fix 4), and for nginx (or anything that traditionally needs to open sockets or low ports) we need to check who to best switch away from root
https://edu.chainguard.dev/chainguard/chainguard-images/reference/nginx/
Users
The official Docker image starts as the root user and forks to a less privileged user. By contrast, the Chainguard nginx Image starts up as a less privileged user and no forking is required. For most users this shouldn't make a difference, but note the "User Directive Warning" outlined previously.
Fix 1 : Lets use a slimmer base image and pin the version
FROM node:19.4-alpine
Alpine is a common choice for slim baseimage if you need an actual distro. If you don't need a distro, we ll see in the last step, that we can also go distroless.
make down rmi
make image2 up
Discuss why we are no longer running ‘apt get upgrade && apt get update'
Fix 2 : lets use a workdir
WORKDIR /opt/blog-search
make down rmi
make image3 up
Discuss
Fix 3 : Only copy stuff you actually need, and into separate dirs
COPY package.json Gruntfile.js LICENSE README.md Makefile ./
make down rmi
make image4 up
Discuss
Fix 4 : Use Multistage and a distroless baseimage
Distroless base images are Docker images that contain only your application and its runtime dependencies. They do not contain package managers, shells or any other programs you would find in a standard Linux distribution. Here are some reasons why they are beneficial:
- Security: Reducing the attack surface of your Docker images is one of the best ways to secure your applications. Distroless images minimize your attack surface by eliminating unnecessary components that could have vulnerabilities.
- Smaller Image Size: Distroless images are smaller than standard base images because they contain fewer layers and less code. This makes your images quicker to build, pull, and push to registries.
- Simplicity: With distroless images, you only have to worry about your application and its direct dependencies. This makes the images simpler to understand and maintain.
- Reduced Maintenance: Fewer components in the image means fewer components that need to be patched and updated, reducing the maintenance burden.
- Consistency: Distroless images help ensure consistency across your applications. Since the images only contain your application and its dependencies, you don't have to worry about inconsistencies between different Linux distributions.
In the below Dockerfile, we're using specific versions of Node.js and Hugo to build the application, and then copying the built application into a distroless NGINX image. This ensures that the final Docker image contains only what's necessary to run the application, reducing its size and attack surface.
FROM node:19.4-alpine AS indexer
WORKDIR /opt/blog-search
COPY package.json Gruntfile.js LICENSE README.md Makefile ./
COPY blog blog
COPY nginxconfig nginxconfig
COPY openssl openssl
RUN npm install -g grunt-cli \
&& npm install \
&& grunt lunr-index

FROM klakegg/hugo:0.101.0-busybox AS builder
WORKDIR /opt/blog-search
COPY --from=indexer /opt/blog-search/ .
WORKDIR /opt/blog-search/blog
RUN hugo


FROM cgr.dev/chainguard/nginx@latest
FROM cgr.dev/chainguard/nginx:latest
COPY --from=builder /opt/blog-search/blog/public/*.html /var/www/html/public/
COPY --from=builder /opt/blog-search/blog/public/*.css /var/www/html/public/
COPY --from=builder /opt/blog-search/blog/public/*.js /var/www/html/public/
EXPOSE 443/tcp
make down rmi make image5 up
docker image inspect image5
This is certainly a production grade build now, but you should also notice that caching doesn't work anymore, since we are discarding the intermediate layers now. This could be annoying if some steps are very slow.
If there are truly static pieces of your build, you can prebuild the builder images ;) to eg already contain the right npm or other libs/SDKs.

Notice, how we went from 2,55 GB to 26 MB !
Notes on distroless
They are the golden standard (if you can't use SCRATCH) and have become a lot simpler to use in the last years.
By definition however, they contain only the binary and immediate dependencies, i.e. you should not use them for early development esp if you want to still debug
At least at the time of writing, it is several times more effortful to debug distroless images vs something small like alpine.
This means, you should have a development build and a distinctly separate production build , and make sure the development artefacts never end up in production :)
Handling secrets during build
As mentioned in Lecture2, containers are tars of tars using a unionFS.
Let's examine what exactly happens when we include secrets:
make down rmi
make imagetar1
Now, at this time, if you haven't looked into the Makefile, you should, because the two Dockerfiles TAR1 and TAR2 are slightly different.
It is your task to build both of them with the Makefile
Inspect the images
Then complete the Makefile where it says #Exercise
What did you discover?
Summary on best practise Dockerfiles
- Use multi stage
- In the final stage use the smallest footprint that makes sense for your app (Wolfi, Alpine or SCRATCH)
- Don't run as root
- Do not copy source code into the final image unless it's really required
- Pin versions of everything as much as it makes sense
- Make sure you are building on recent version of components (check for CVEs and always remove critical CVEs if at all possible)
- Don't run apt-get upgrade (or equivalent) inside the build process
- If you have a development image, make sure it can never end up in production
How to automate building of images
To make it more time efficient to build images and of course to let others build them, too. Automation is crucial.
We ll now look into a very simple github build-scan pipeline for an image
First, the triggers
As you may remember from the Terraform exercise, also github allows you to define how and when pipelines trigger. Take a moment to experiment with how they work
Exercise: setup the first pipeline in your own repo and run an empty pipeline to understand how it triggers. Make sure, that you can trigger it.
name: Build and push lecture5 image
on:
 push:
   branches:
     - main
     - features/lecture5-2
     - features/tarball
 pull_request:
   branches: [ main ]

# Allows you to run this workflow manually from the Actions tab
 Workflow_dispatch:
jobs:
build:
name: Build
runs-on: ubuntu-20.04
steps:
- name: Checkout code
uses: actions/checkout@v3heckout@v3
Cat multi-stage-build/.github/workflows/publish-image.yml
Multi-arch
Cause Intel is not alone anymore, so we can add the buildx (still not stable) feature and specify the desired platform.
         docker buildx build \
         --tag ${{ env.REGISTRY }}/${{ env.IMAGE_NAME }}:${{ github.sha }} \
         --platform linux/amd64,linux/arm/v7,linux/arm64 -f Dockerfile5 .
Scanning
We can use various standard FOSS tools to check the quality of our Images and auto-upload the results into the GitHub Tab. Here is a very common vulnerability scanning example.
 - name: Run Trivy vulnerability scanner
       uses: aquasecurity/trivy-action@0.18.0
       with:
         image-ref: '${{ env.REGISTRY }}/${{ env.IMAGE_NAME }}:${{ github.sha }}'
         format: 'sarif'
         output: 'trivy-results.sarif'
https://github.com/AustrianDataLAB/multi-stage-build/security/code-scanning?query=branch%3Afeatures%2Ftarball+
Tagging
Check on the artefact tab, Make sure the image name is correct. The image name should be in the format ghcr.io/OWNER/IMAGE_NAME:TAG
https://github.com/AustrianDataLAB/multi-stage-build/pkgs/container/multi-stage-step2
In our blog webpage, we were already using Docker Compose, in order to load volumes, expose ports etc . Let's now take it further and go multi-image
Docker Compose is a tool for defining and managing multi-container Docker applications. It uses YAML files to configure application's services and performs the creation and start-up process of all the containers with a single command.
- Multiple isolated environments on a single host: Docker Compose uses a project name to isolate environments from each other, which allows you to run multiple copies of an environment on a single host.
- Preserve volume data when containers are created: Docker Compose preserves all volumes used by your services.
- Only recreate containers that have changed: Docker Compose re-uses existing containers when you make changes to your docker-compose.yml file and re-run the docker-compose up command.
- Variables and moving a composition between environments: You can use environment variables in your Compose file, which can be a helpful way to move compositions between environments.
Docker Compose
git clone git@github.com:AustrianDataLAB/pacman.git
make docker-deskop
Now, on localhost:8080 you can play a very sophisticated game.
Or : read the Docker Compose file and understand how you can use .env files, create networks, volumes etc
Translate the above to your own "Startup Idea"
The entire local + CI process will be setup between lectures 4 AND 5
Now that you have a minimal reference for how to use existing images, build your own or modify other people's , plus how to glue containers together via docker compose -> start iterating over your startup idea
Every decision must be logged and the suggested approaches are ADRs (https://adr.github.io/ ) .
Goal
by the end of the 5th lecture (that's the next one, since your instructor is quite aware that the exam is in 2 days):
- you need to have a clear idea of
buy vs buildfor at least one component - discarded a few approaches that didn't work at all (write down why)
- have made at least one decision codified in a lightweight ADR
- edited your Value Proposition and made it more concise
In general:
- you should be building /producing something, like a container image as an artifact
- (while you can have
manyimages,oneis required)
IMPORTANT
your writeup of why which ideas failed -> goes into your final report -> keep your notes (or have a setup in your repo/github/whatever where you dont lose those notes)
Congratulations, you've successfully setup your GPG signing key, created a best practise image, executed a image build pipeline on github and tried out Docker-Compose.
What's next?
- On Thursday there is the 1. Exam
- Make sure to read this lecture and try the pipelines at home
- Next week, we ll cover CI properly