Welcome to the fifth lecture, where today we will understand how to setup and work with a continuous integration pipeline on github
Last Updated: 2024-1-11
Why should I care about continuous integration?
...
What you'll build today
By the end of today's lecture, you should have
- ✅ an fully fledged github CI pipeline
- ✅ write at least one ADR
- ✅ reuse DockerCompose for CI testing
- ✅ add a test step to your pipeline
- ✅ have a rule when the pipeline breaks due to non-compliance
- ✅ implement a integration test
- ✅ take a look at your SBOM (software bill of materials)
- ✅ set up a self-hosted build agent (even if you choose not to use it)
Homework (Flipped Classroom)
Prepare
- A working Container Image Build pipeline in your github org
- All of your team have GPG keys and can commit verified commits
- (one of) your Dockerfiles follows best practice recipe
- Something to test your functionality (to implement at least one test) -> think about a quality criterium your team would like to measure (or improve)
PreRead
- https://www.cncf.io/wp-content/uploads/2022/06/CNCF_cloud-native-security-whitepaper-May2022-v2.pdf (page 12-14)
What you'll need
- TBD
- The usual (git, slack, MFA app, laptop with internet, github account etc)
Continuous Integration (CI) has revolutionized the software industry in several ways:
- Faster Feedback Loop: CI provides developers with immediate feedback on their code changes. This allows them to detect and fix issues early in the development cycle, reducing the cost and time required to fix bugs.
- Increased Code Quality: By running automated tests on every code change, CI helps to maintain high code quality and prevent the introduction of bugs into the codebase.
- Reduced Risk: CI reduces the risk associated with software releases. By integrating and testing changes frequently, it minimizes the chance of encountering serious issues during the release process.
- Improved Collaboration: CI encourages developers to share their code and integrate changes frequently. This promotes collaboration and helps to build a shared understanding of the codebase.
- Efficient Release Process: With CI, the codebase is always in a releasable state. This enables teams to release software more frequently and efficiently, accelerating the delivery of new features and improvements to users.
In summary, CI has made software development more efficient, reliable, and collaborative, enabling teams to deliver high-quality software at a faster pace.
So far goes the theory, in practise, it also has created a lot of headaches, which in turn were solved by approx 1 gazillion solutions :) .
Lets see what projects are out there and how they differ
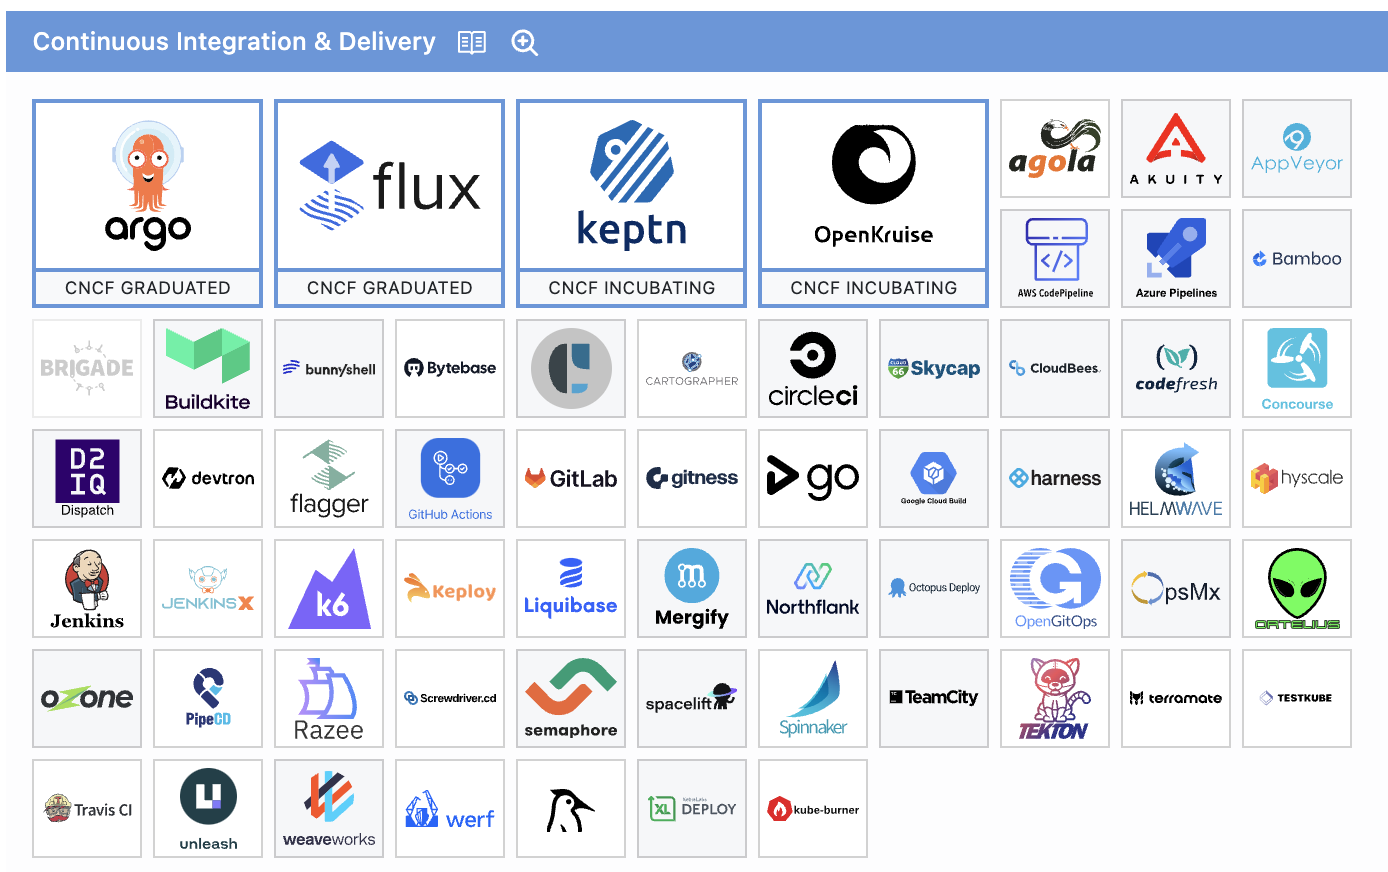
Navigating Container Landscapes
https://landscape.cncf.io/guide#app-definition-and-development--continuous-integration-delivery
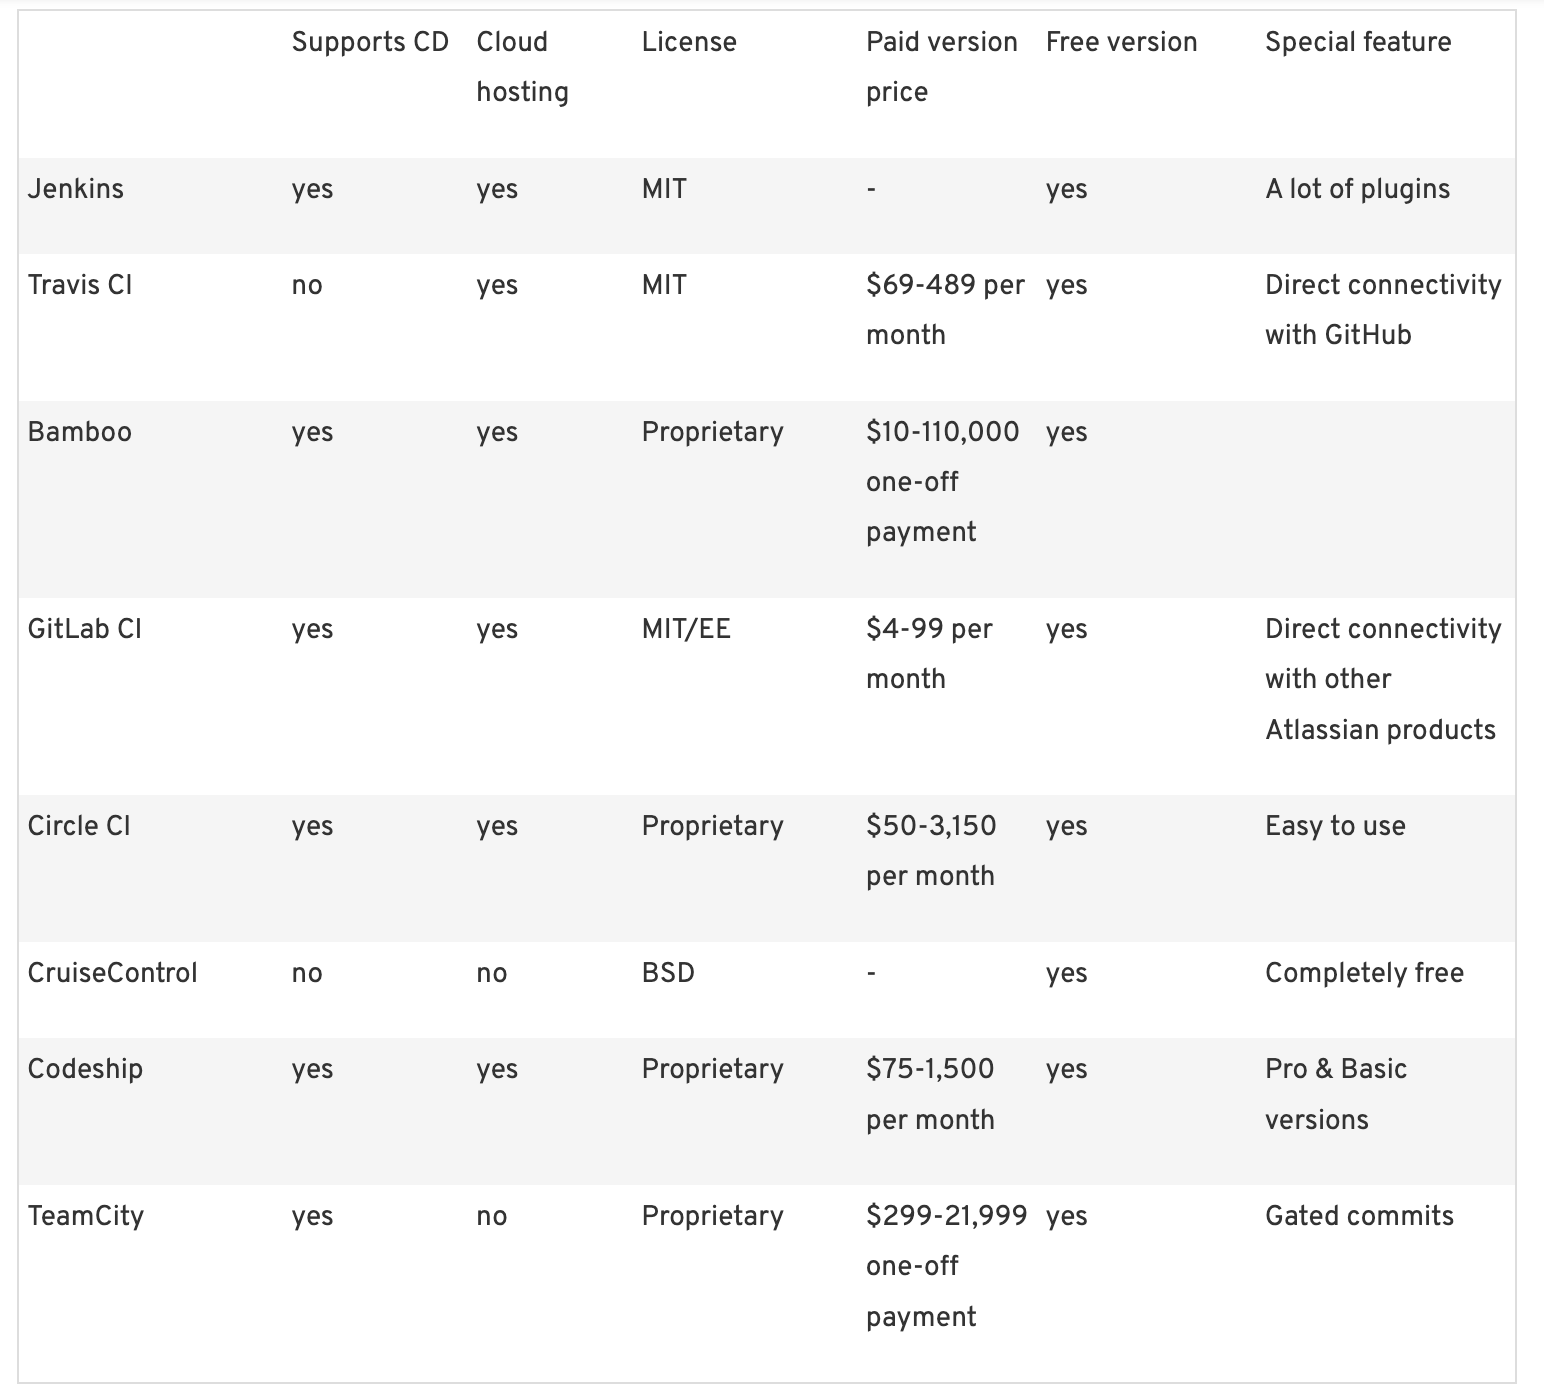
https://www.ionos.com/digitalguide/websites/web-development/continuous-integration-tools/
When it comes to choosing CI, there are 3 important facts to consider
- You can have many different ones, and best of breed is likely a good idea
- Some CI is very very delicate, eg. when it uses highly powered credentials and here traditional perimeter security on top of best practise should be considered (running it on prem or in an otherwise unshared controlled environment)
- What and for whom are you building an artefact: is it a library used by millions or something only you use? The impact on supply chain security and scrutiny is vastly different.
It could be beneficial to make it explicit, in an opensource project, if you are *not (yet) implementing best practises and that whoever uses the code, should please double check if they need any e.g. attestations.
We'll start out with the most straightforward problem: using github Actions to build a Dockerimage
Most people, when they start with a small idea, don't want to implement their self-hosted, military-grade CI/CD system. At least not as step 1.
So, we ll start with (at the time of writing) the most common CI automation which is Github Actions using the free-tier cloud-hosted runners (also called agents) using a somewhat recent ubuntu as agent OS.
Github Actions (hosted) and uploading of results files
Let's return to our example from last Tuesday (lecture 4) where we built the blog (npm/hugo) image.
git clone git@github.com:AustrianDataLAB/multi-stage-build.git
cd multi-stage-build
git checkout -b features/lecture5-2
Look at the workflows defined in the .github folder. Our first goal is to add a unit-test.
If you look at the Dockerfile and the code, you might find that there are some basic unit tests added and a stage in the Dockerfile itself
# Run unit tests
FROM node:16-alpine AS tester
WORKDIR /opt/blog-search
COPY . .
RUN  npm install --save-dev jest-junit && npm install\
&& npx jest Gruntfile.test.js
Exercise 1: Discuss the usefulness of adding the above stage into the Build Process
Unit testing in DockerCompose
Let's take a different approach and instead create a separate Dockerfile for running tests.
We additionally (not strictly necessary) run the commands in DockerCompose. This is handy as mounting of volumes is (IMO) much more straightforward and the combination with Make is also pretty straightforward.
However, for a single Image, we wouldn't really need Compose yet.
If you now take a look at the github Action workflow test-integration.yml and you trigger it (or look at previous output).
You see
- That the pipeline built the Dockerfile.test on the spot during the workflow
- That the jest test was executed
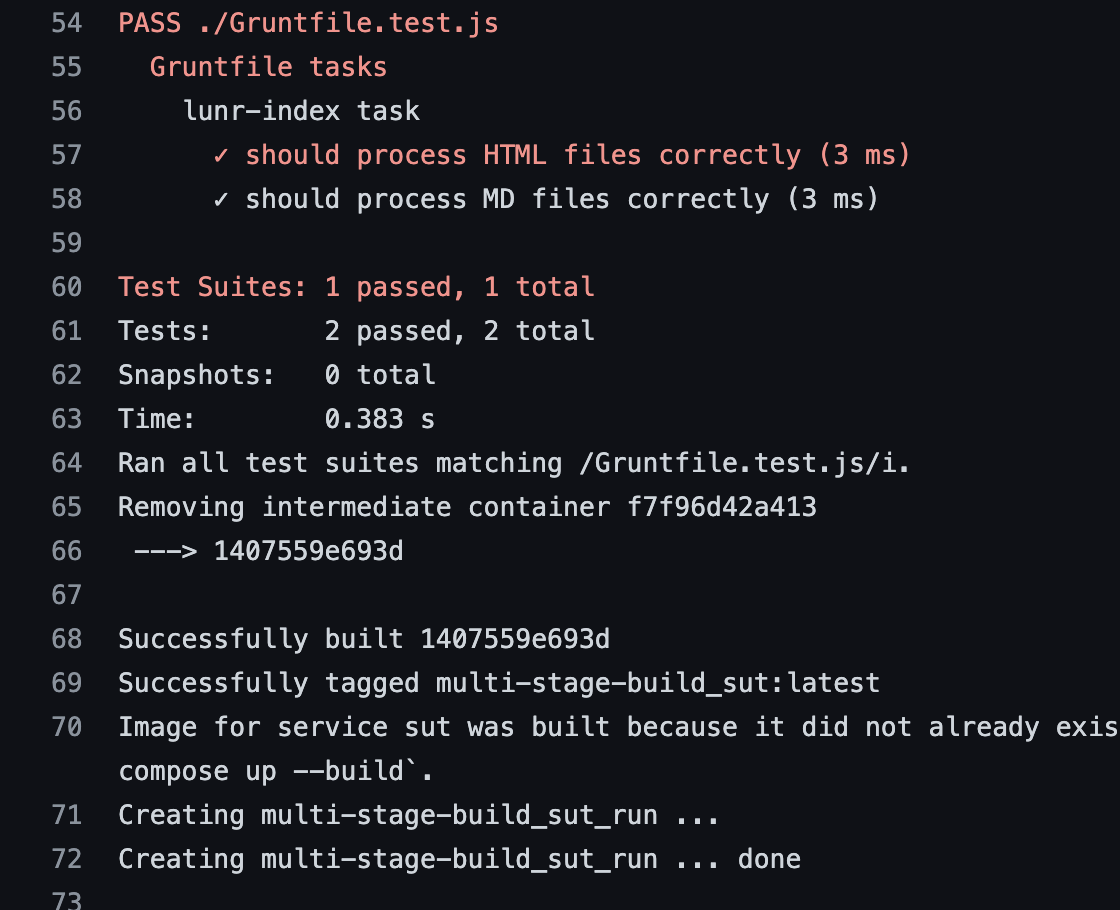
b) The junit results xml was uploaded to Github and this was facilitated by the volume mount in the Dockercompose file.
We can look at the pipeline which is now very compact:
- uses: actions/checkout@v2
- name: Build the localdev environment
run: make generate_certs
- name: make
run: make sut
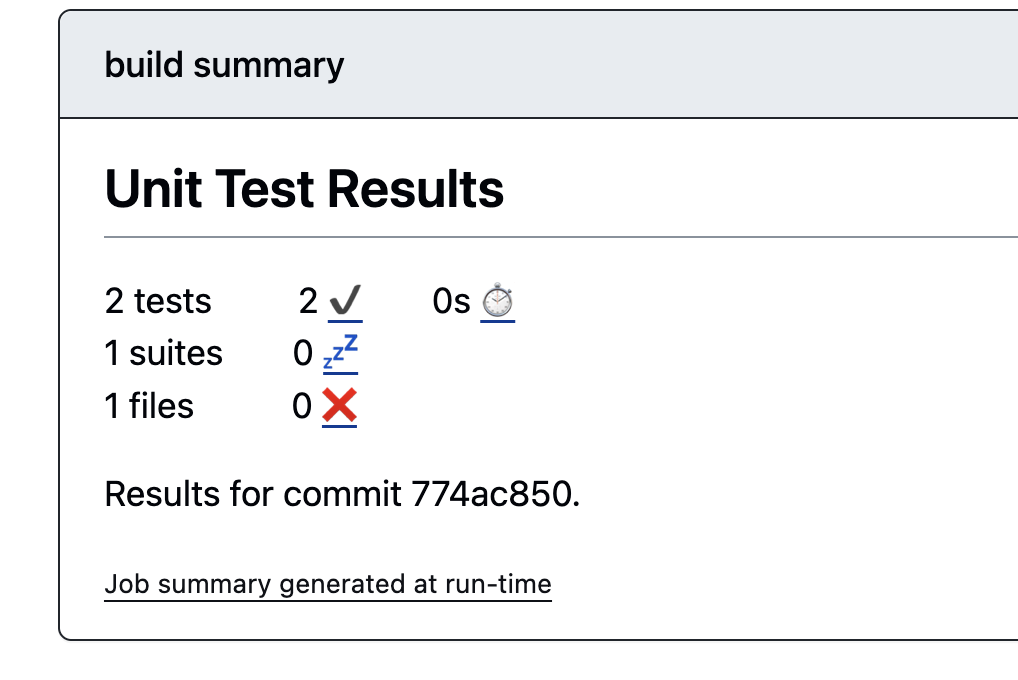
- name: Publish Unit Test Results
uses: EnricoMi/publish-unit-test-result-action@v1
if: always()
with:
github_token: ${{ secrets.GITHUB_TOKEN }}
files: ./test-results/junit/*.xmlhttps://github.com/AustrianDataLAB/multi-stage-build/actions/runs/8482156456 
Exercise 1: add a non-trivial test case to your own artefact and automate the test execution
Taking inspiration from what you just seen, formulate a single quality test for your artefact (Dockerimage) and implement a pipeline that reports it.
You may remember having encountered this in the recent past, now is the question: when is it justified to let a pipeline fail if some quality criterion is not met
We will now return to CVEs in Images, as they are still the most frequent cause of build gates blocking.
This happens over time, as CVEs get discovered and patches are released that older packages, OS and images are outdated. There are several scanners that will automatically scan your images for you and "talk" to you about what they have found.
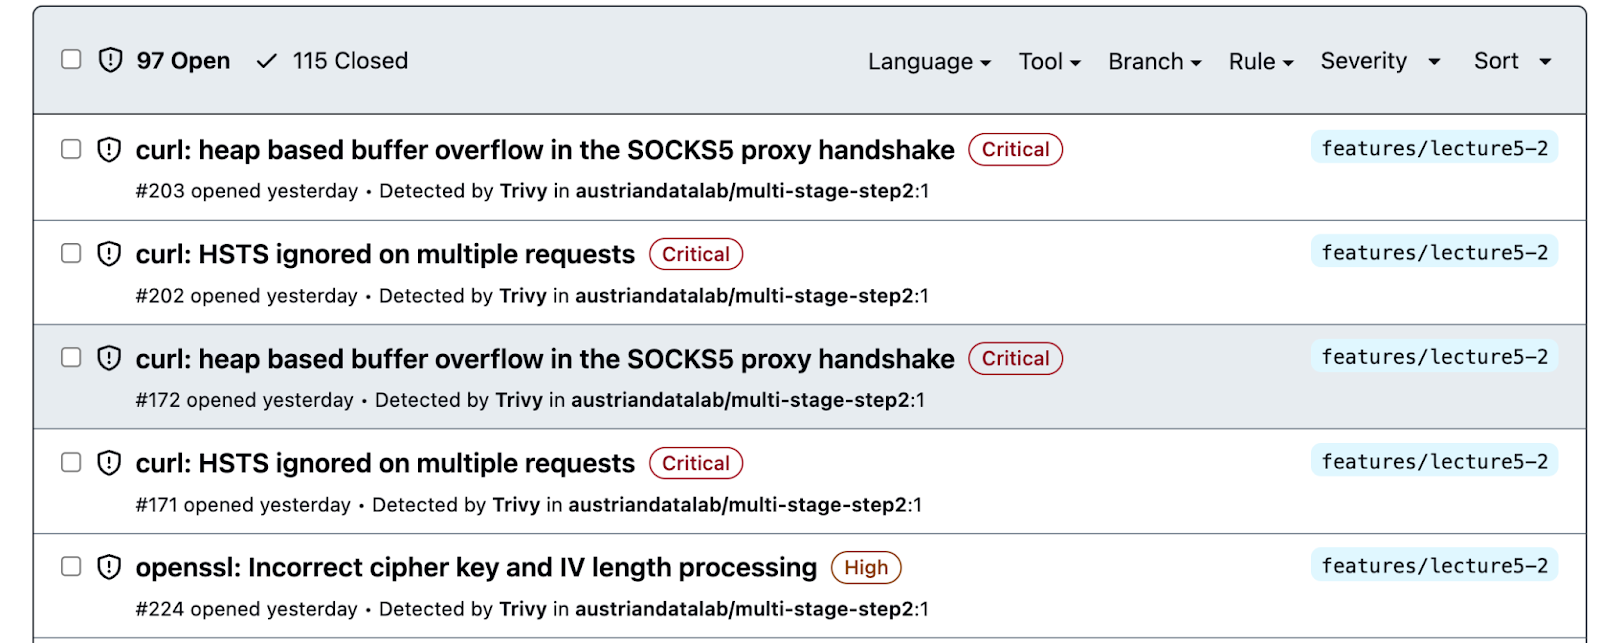
Github Image build with a trivvy scan
Trivy is a simple and comprehensive vulnerability scanner for containers. It's used to detect vulnerabilities in OS packages (Alpine, RHEL, CentOS, etc.) and application dependencies (Bundler, Composer, npm, yarn, etc.).
Staying in the same repo, same branch, we see that the Dockerfile contains some problematic vulnerabilities. Well, actually , you probably dont see it unless you navigate to the Security tab and select the correct branch first .

Lets fix the issue then. Given that the Github navigation IMO is a nightmare, lets change the reporting to inline.
     - name: Run Trivy vulnerability scanner
       uses: aquasecurity/trivy-action@master
       with:
         image-ref: '${{ env.REGISTRY }}/${{ env.IMAGE_NAME }}:${{ github.sha }}'
         #format: 'sarif'
         format: 'table'
         output: 'stdout'
         #output: 'trivy-results.sarif'
Now, I will change the pinned version of nginx and copy only what I know we will need:
FROM cgr.dev/chainguard/nginx@sha256:bcc6b0d052298112e4644b258de0fa4dc1509e3df8f7c0fba09e8c92987825e7
COPY --from=builder /opt/blog-search/blog/public/ /var/www/html/public/
EXPOSE 443/tcp
To
FROM cgr.dev/chainguard/nginx:latest
COPY --from=builder /opt/blog-search/blog/public/*.html /var/www/html/public/
COPY --from=builder /opt/blog-search/blog/public/*.css /var/www/html/public/
COPY --from=builder /opt/blog-search/blog/public/*.js /var/www/html/public/
EXPOSE 443/tcp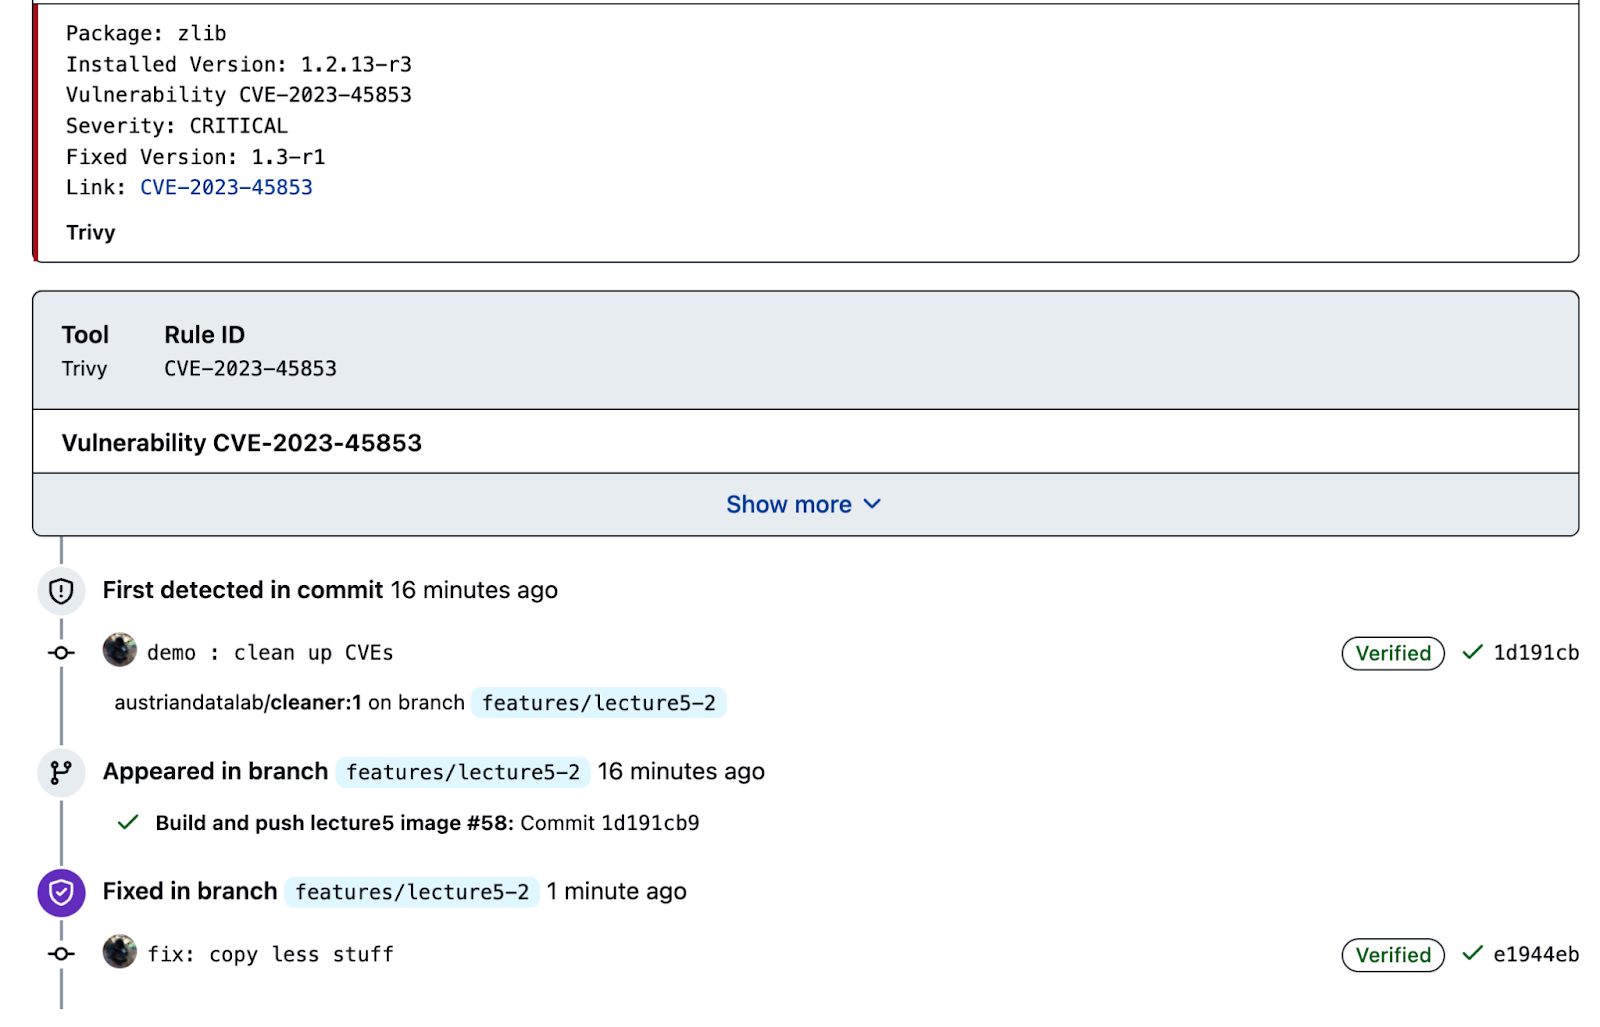
Exercise 2: scan your artefact and clean it (of CVEs)
In the end of the lecture-series, your instructor will ask you to show that your artefacts contain no known, patchable CRITICAL and HIGH CVEs, take now a moment to scan your artefact and if possible, clean it already now.
Buy vs build
Last task for today is to run your own build-agent in two different flavours : containerized or vm-based.
We will also discuss why docker-build agents specifically are difficult to run in containers (cf rootless)
set up a self-hosted GitHub Actions runner on a virtual machine:
- Prepare the VM: Ensure your VM is running a supported operating system . You can use the VM that was prepared for you just like in the admission test, to access via a jumphost.
- Install the necessary software: Depending on your workflows, you might need to pre-install certain software on your VM, such as Git, Docker, Node.js, etc.
- Create a folder for the runner:
mkdiractions-runner && cdactions-runner- Download the runner:
- For Linux:
curl-O-Lhttps://github.com/actions/runner/releases/download/v2.284.0/actions-runner-linux-x64-2.284.0.tar.gz- For macOS:
curl-O-Lhttps://github.com/actions/runner/releases/download/v2.284.0/actions-runner-osx-x64-2.284.0.tar.gz
- Extract the installer:
tarxzf./actions-runner-linux-x64-2.284.0.tar.gz- Configure the runner:
./config.sh--urlhttps://github.com/YOUR_USERNAME/YOUR_REPOSITORY--tokenYOUR_TOKEN- Replace YOUR_USERNAME and YOUR_REPOSITORY with your GitHub username and repository name. Replace YOUR_TOKEN with a token you generate from GitHub.
To generate a token:
- Go to the repository on GitHub.
- Click on "Settings" -> "Actions" -> "Runners".
- Click on "Add runner" and follow the instructions to get the token.
- Install the runner:
./run.sh
Now your self-hosted runner should be up and running. You can verify this by going to the "Settings" -> "Actions" -> "Runners" section of your repository on GitHub. You should see your new runner listed there.
Why you must keep the build segments very separate from runtime segments and how to env separate them
A very common mistake, that can lead to compromise of systems, even if CI best practices are adhered to, is to put build systems and runtime systems into connected (network/identity) segments.
Never mix build and run !!!
Build-systems (i.e. the location where the artefacts get produced) are highly privileged since they contain development and testing tools and all sorts of software that can take apart software in order to battle-test it.
Also the build-systems themselves are thus more vulnerable because they have a huge attack-surface, the most common one still being the (traditional) docker-socket (which essentially gives an attacker root on the host).
Thirdly, controlling the build-system implies controlling all software that gets produced.
Now, a lot of documentation on the internet may suggest that build and dev should be close . And in a logical sense, they should. But, make sure that you threat-model and actively pen-test your own systems and double check that noone can takeover your build-systems.
Below is a Microsoft example on documenting software propagation for their arc offering and no matter, which best practise reference you choose to follow, please put as much protection, network segregation, identity, signoff etc on your build-systems. These are the systems of greatest leverage for a modern attacker (remember the SolarWinds attack). We will come back to this topic in lecture 8 (artefacts and registries).
https://learn.microsoft.com/en-us/azure/azure-arc/kubernetes/conceptual-workload-management
Congratulations, you've successfully completed the continuous integration lecture, built pipelines, scanned images and automated tests. Hopefully, this can take a lot of grunt work off your hands in the future.
What's next?
- Kubernetes